Recreating a retro puzzle game with Godot and Rust - Part 1
August 17, 2024
Learn gamedev with gdext by creating a clone of the 1995 game Zoop.
Did you know that you can write scripts for the Godot game engine with Rust?
That's right. And it's probably easier than you think it is!
It might not be the right fit for every game, but for games that require a lot of logic, my experience has been that Rust's syntax and type system are very powerful.
In this tutorial, I'll be teaching you how to hook up Godot with Rust so you can write performant and memory-safe code for your games. And what better way to do that than by reviving an old game from the 90s?
The Game
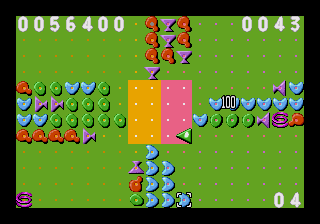
Zoop is a real-time puzzle game originally released in 1995 for the Super Nintendo and Sega Genesis. The player must eliminate pieces spawning from each side of the screen before they reach the center of the field. The player is a ship located in the center that can move within a designated section and shoot at opponents. If the color matches, the opponent will be destroyed. If not, the opponent's color will be swapped with the player's current color.
Because we're recreating Zoop with the Godot game engine, I'll be naming this project the legally distinct "Goop". To better fit this theme, the player will be fighting spooky slimy aliens.
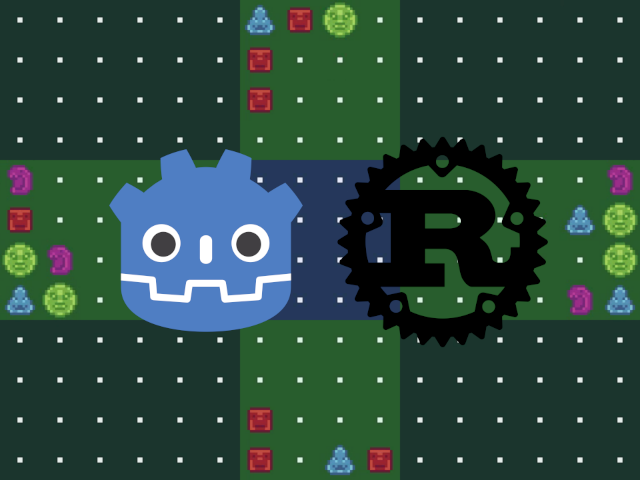
This will be the finished project:
If you would like to follow along with the source code, you can find it here.
This is what will be covered over the course of this tutorial:
- Playfield
- Player movement
- Enemy spawn
- Enemy movement
- Shooting (A.K.A. "gooping")
- Color swapping
- Lose conditions
- Difficulty levels
- Score tracker
- Build for desktop and web
Setup
Before starting this tutorial, make sure you have both Godot version 4.1 or later and the Rust programming language installed.
We'll be creating the following file structure:
project_dir
    .git/
    godot/
        .godot/
            extension_list.cfg
        Goop.gdextension
        project.godot
    rust/
        Cargo.toml
        src/
            lib.rs
        target/
            debug/
Note that the Godot and Rust parts are separate.
Rust crate
First, let's make a new Rust crate:
cargo new rust --lib
Open Cargo.toml and modify its contents:
[package]
name = "rust"
version = "0.1.0"
edition = "2021"

[lib]
crate-type = ["cdylib"]

[dependencies]
godot = { git = "https://github.com/godot-rust/gdext", branch = "master" }
When you run cargo build on Linux, a library file should be compiled at rust/target/debug/librust.so. Other platforms will create different files. This will be different if you changed the name of your crate.
.gdextension
Next, we will need a .gdextension file, which will tell Godot how to load our Rust code.
Create a file at godot/Goop.gdextension:
[configuration]
entry_symbol = "gdext_rust_init"
compatibility_minimum = 4.1
reloadable = true

[libraries]
linux.debug.x86_64 =     "res://../rust/target/debug/librust.so"
linux.release.x86_64 =   "res://../rust/target/release/librust.so"
windows.debug.x86_64 =   "res://../rust/target/debug/rust.dll"
windows.release.x86_64 = "res://../rust/target/release/rust.dll"
macos.debug =            "res://../rust/target/debug/librust.dylib"
macos.release =          "res://../rust/target/release/librust.dylib"
macos.debug.arm64 =      "res://../rust/target/debug/librust.dylib"
macos.release.arm64 =    "res://../rust/target/release/librust.dylib"
The important part here is the [libraries] section, where the library file generated by your operating system should be.
extension_list.cfg
Next, we need to edit the file located at godot/.godot/extension_list.cfg. If it doesn't exist already, create it.
This should be its contents:
res://Goop.gdextension
The extension should now be registered by your Godot project.
Entry point
In order to expose our extension to Godot, we need to define an entrypoint.
Add the following to your lib.rs:
use godot::prelude::*;

struct GoopExtension;

#[gdextension]
unsafe impl ExtensionLibrary for GoopExtension {}
Rust Code
Now that we're all set up, let's start coding!
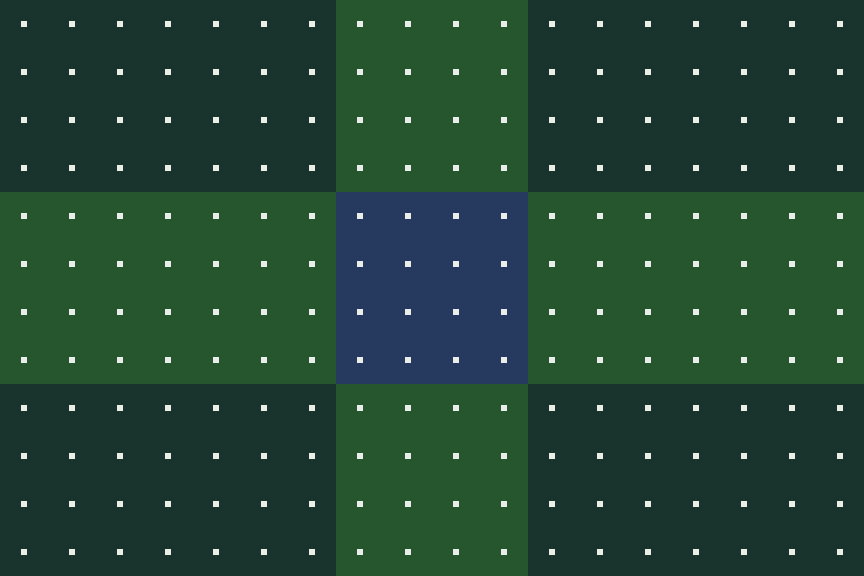
We'll start by defining the playfield. The game will be played over an 18x12 grid, with the middle 4x4 section being the player's movable area.
Here is what we'll be creating:
To follow along with this part, you can download the spritesheet from the GitHub repo.
When using gdext, we have the ability to register Rust structs as a class in the Godot engine:
use godot::prelude::*;
use godot::classes::TileMap;

#[derive(GodotClass)]
#[class(init, base=TileMap)]
struct Field {
  base: Base<TileMap>,
}
With this code, we are specifying both that we want Godot to register our struct as a class and that we want to inherit TileMap as the base class. How this works will become more clear later when we work in Godot's scene editor.
For now, let's define more of our game logic. In the game, each tile in the grid will be occupied by either empty space, the player or an enemy. Both the player and enemies can also be one of four colors: red, green, blue, and purple.
We can represent all of this by adding a couple of enums to our code:
#[derive(Debug, Clone, Copy, Default)]
enum Color {
  #[default]
  Red,
  Green,
  Blue,
  Purple,
}

#[derive(Debug, Clone, Copy, Default)]
enum Tile {
  #[default]
  None,
  Player,
  Enemy,
}
Next, we will add a grid to our Field struct:
const GRID_WIDTH: usize = 18;
const GRID_HEIGHT: usize = 12;

#[derive(GodotClass)]
#[class(init, base=TileMap)]
struct Field {
  grid: [[Tile; GRID_HEIGHT]; GRID_WIDTH],
  base: Base<TileMap>,
}
Notice the inclusion of init in the #[class] attribute. We need this in order to initialize grid to its default value, which is why we marked Tile::None as the default earlier. When the object is created, the grid will be filled with None tiles.
In the spritesheet, there are 3 different tiles for the center, edges and corners of the field.
The gdext API allows us to implement interfaces for Rust structs that give access to lifecycle methods such as _ready() and _process().
We'll be making use of this to programatically generate the tiles for the tilemap when the node is first added to the scene:
use godot::classes::{ITileMap, TileMap};

const CENTER_SIZE: usize = 4;
// X coordinate of center ranges from 7-10
const MIN_CENTER_X: usize = GRID_WIDTH / 2 - CENTER_SIZE / 2;
const MAX_CENTER_X: usize = GRID_WIDTH / 2 + CENTER_SIZE / 2 - 1;
// Y coordinate of center ranges from 4-7
const MIN_CENTER_Y: usize = GRID_HEIGHT / 2 - CENTER_SIZE / 2;
const MAX_CENTER_Y: usize = GRID_HEIGHT / 2 + CENTER_SIZE / 2 - 1;

#[godot_api]
impl ITileMap for Field {
  fn ready(&mut self) {
    self.rng = thread_rng();

    for x in 0..GRID_WIDTH {
      for y in 0..GRID_HEIGHT {
        // True if x is within 4x4 player field
        let x_in_center = x >= MIN_CENTER_X && x <= MAX_CENTER_X;
        // True if y is within 4x4 player field
        let y_in_center = y >= MIN_CENTER_Y && y <= MAX_CENTER_Y;

        let (i, j) = match (x_in_center, y_in_center) {
          // If both are in center, use tile is in center. Use sprite located at (0, 0).
          (true, true) => (0, 0),
          // If only one is in center, use tile is on edge. Use sprite located at (1, 0).
          (true, false) | (false, true) => (1, 0),
          // If neither are in center, use tile is in corner. Use sprite located at (2, 0).
          (false, false) => (2, 0),
        };

        // set tile
      }
    }
  }
}
Since the Field struct inherits the TileMap class, we actually have the ability to use the tilemap directly.
We can do this by calling self.base_mut(), which gives us direct access to the methods of the base class.
Remove the // set tile comment and add the following:
self.base_mut()
  // first argument is layer
  // second argument is position of cell in tilemap
  .set_cell_ex(0, Vector2i::new(x as i32, y as i32))
  // the ID of the tileset
  .source_id(0)
  // coordinates of the sprite in the tileset
  .atlas_coords(Vector2i::new(i, j))
  .done();
(x, y) refers to the position of the cell in the tilemap and (i, j) refers to the coordinates of the sprite in the tileset.
Final Code
Your final code should look like this:
use godot::prelude::*;
use godot::classes::{ITileMap, TileMap};

const GRID_WIDTH: usize = 18;
const GRID_HEIGHT: usize = 12;
const CENTER_SIZE: usize = 4;
const MIN_CENTER_X: usize = GRID_WIDTH / 2 - CENTER_SIZE / 2;
const MAX_CENTER_X: usize = GRID_WIDTH / 2 + CENTER_SIZE / 2 - 1;
const MIN_CENTER_Y: usize = GRID_HEIGHT / 2 - CENTER_SIZE / 2;
const MAX_CENTER_Y: usize = GRID_HEIGHT / 2 + CENTER_SIZE / 2 - 1;

#[derive(Debug, Clone, Copy, Default)]
enum Color {
  #[default]
  Red,
  Green,
  Blue,
  Purple,
}

#[derive(Debug, Clone, Copy, Default)]
enum Tile {
  #[default]
  None,
  Player,
  Enemy,
}

#[derive(GodotClass)]
#[class(init, base=TileMap)]
struct Field {
  grid: [[Tile; GRID_HEIGHT]; GRID_WIDTH],
  base: Base<TileMap>,
}

#[godot_api]
impl ITileMap for Field {
  fn ready(&mut self) {
    self.rng = thread_rng();

    for x in 0..GRID_WIDTH {
      for y in 0..GRID_HEIGHT {
        let x_in_center = x >= MIN_CENTER_X && x <= MAX_CENTER_X;
        let y_in_center = y >= MIN_CENTER_Y && y <= MAX_CENTER_Y;

        let (i, j) = match (x_in_center, y_in_center) {
          (true, true) => (0, 0),
          (true, false) | (false, true) => (1, 0),
          (false, false) => (2, 0),
        };

        self.base_mut()
          .set_cell_ex(0, Vector2i::new(x as i32, y as i32))
          .source_id(0)
          .atlas_coords(Vector2i::new(i, j))
          .done();
      }
    }
  }
}
Godot Editor
That will be it for our Rust code for now, but we're still not finished!
Let's switch over to Godot and place our Field class in the scene.
Make sure you run cargo build in your rust directory before continuing. If you had Godot open before this, you might need to restart it.
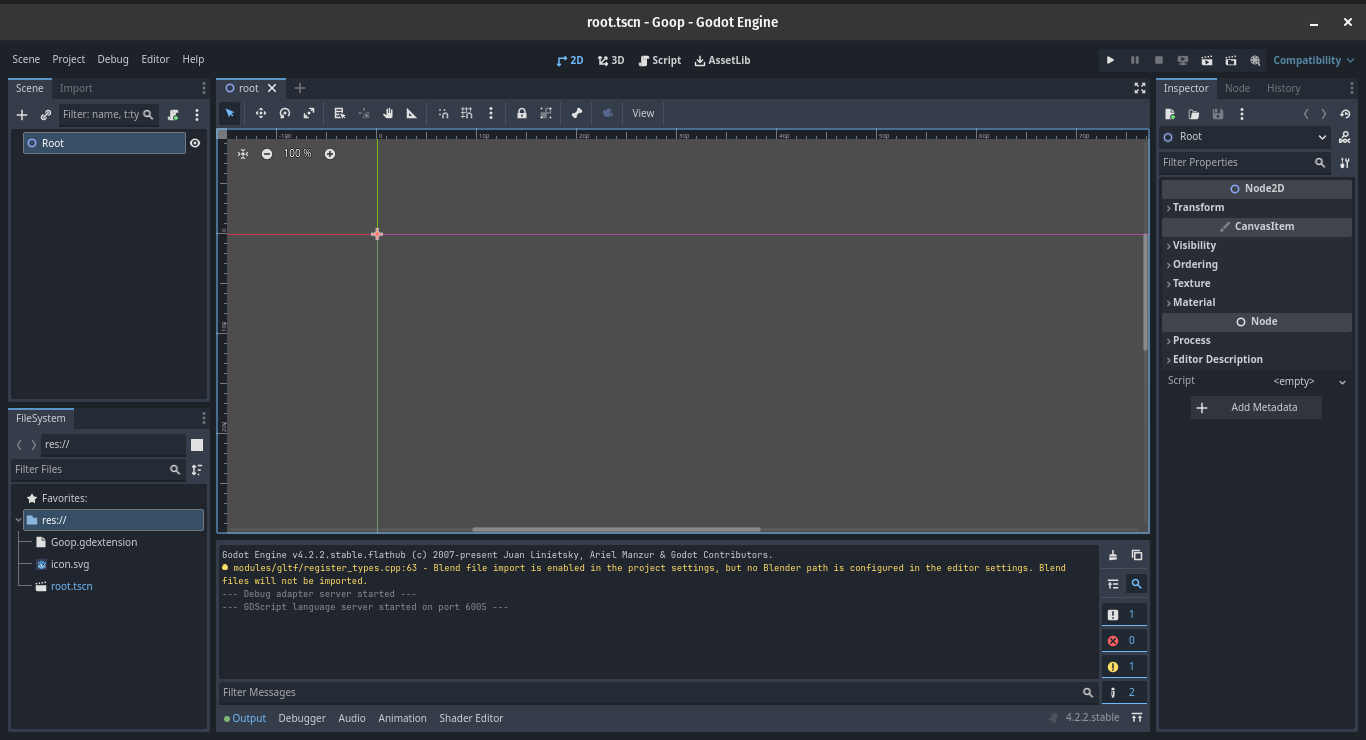
Create an empty scene at res://root.tscn.
Your project should look like this:
Adding the Field node is very simple.
Right-click on the Root node and select "Add child node..". In the "Create New Node" menu, type "Field" into the search.
If you compiled your project, you should be able to see it under TileMap:
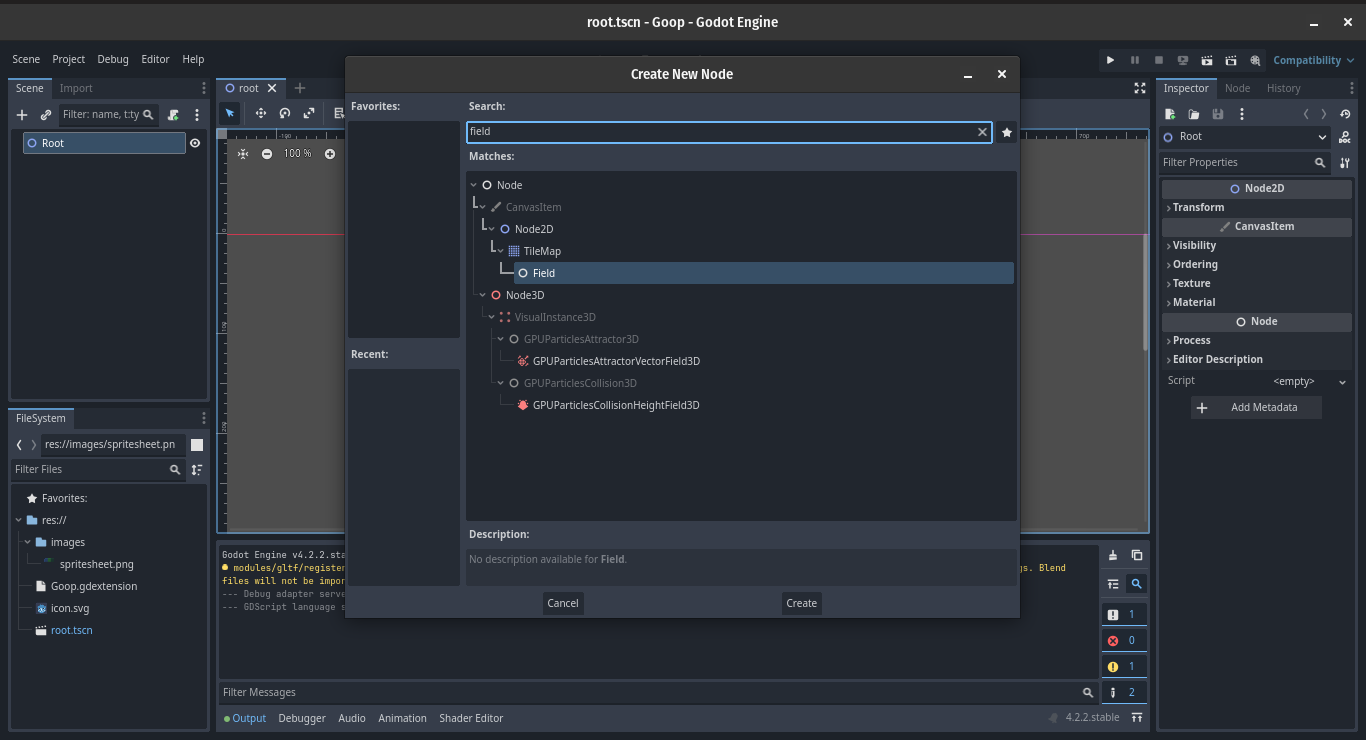
After selecting the Field node, it should be added to the tree. Click on it to open it in the inspector.
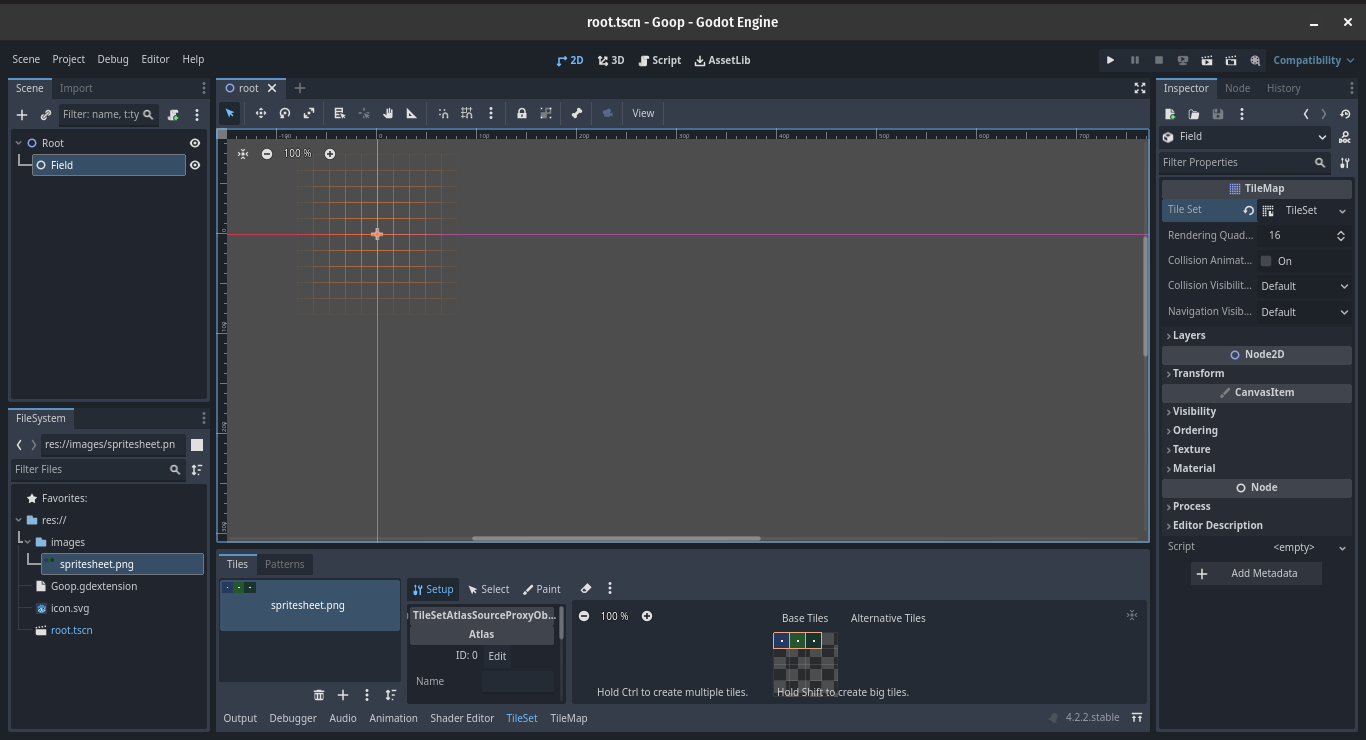
Since the Field node inherits TileMap, there should be a "Tile Set" property. Click on it and select "New TileSet".
At the bottom of your editor, open the "TileSet" tab. Select the spritesheet and drag it into the space under "Tiles".
You should be here:
Now that we have the tile set configured, our code actually works now!
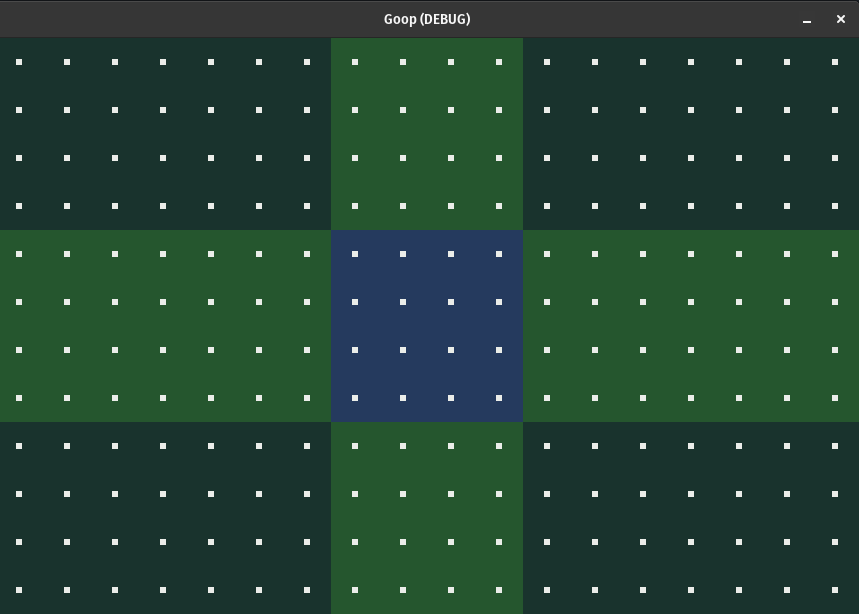
If you run the game, you should see this:
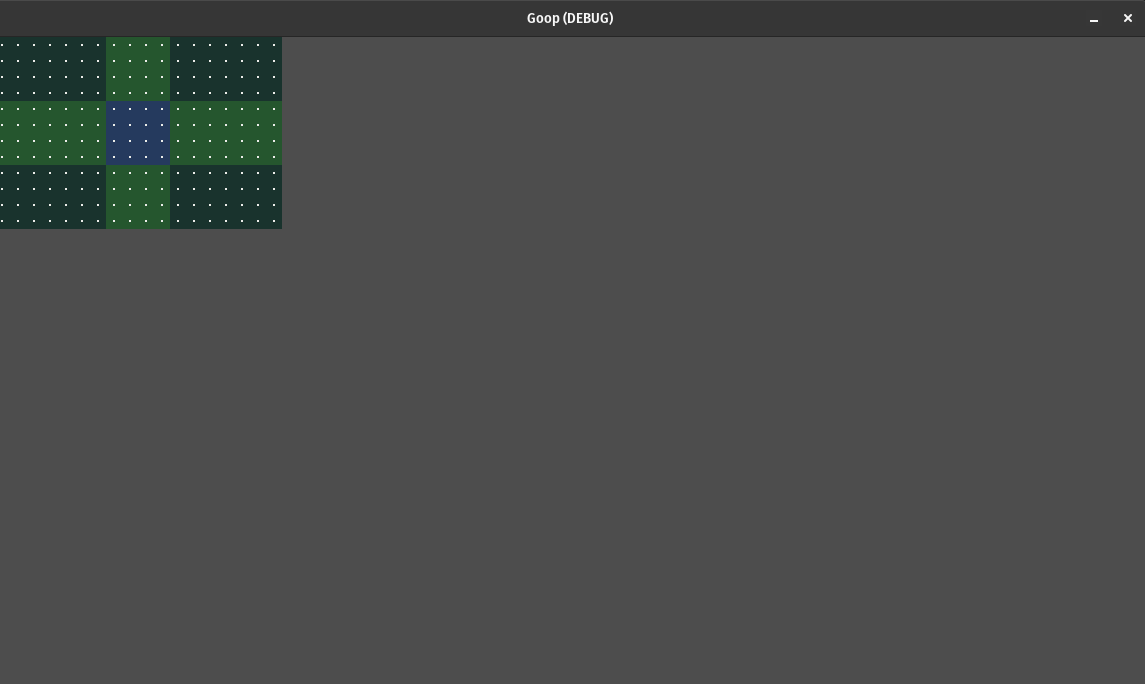
However, there's still a glaring issue. It's too small and does not fill up the entire screen. Let's fix that.
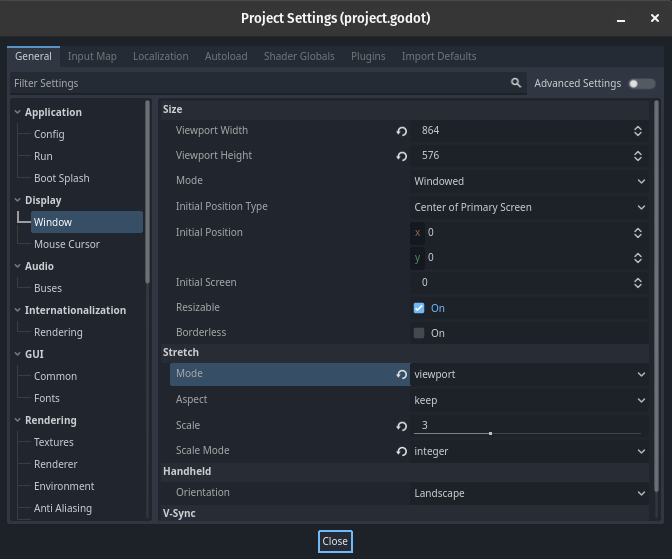
Open up Project > Project Settings and select the Display > Window tab.
Since our game has 18x12 tiles, each with a 16x16 sprite, we should scale our viewport size to a multiple of 288x192.
To make the game easier to see, let's scale it by 3. Set "Viewport Width" to 864, "Viewport Height" to 576, and "Scale" to 3.
Also, to make sure the game looks good on larger screen sizes, set "Mode" to "viewport" and "Scale Mode" to "integer".
It should look like this:
This time, when we run the game, it should fill the entire window:
Conclusion
Phew, that was a lot!
To recap, in this article, we learned how to:
- Import Rust extensions into Godot
- Write scripts for Godot nodes using nothing but Rust
- Import custom nodes into Godot's scene editor
If you enjoyed this tutorial, make sure to follow me on Itch.io.
Stay tuned for part 2, where we'll be implementing player movement!